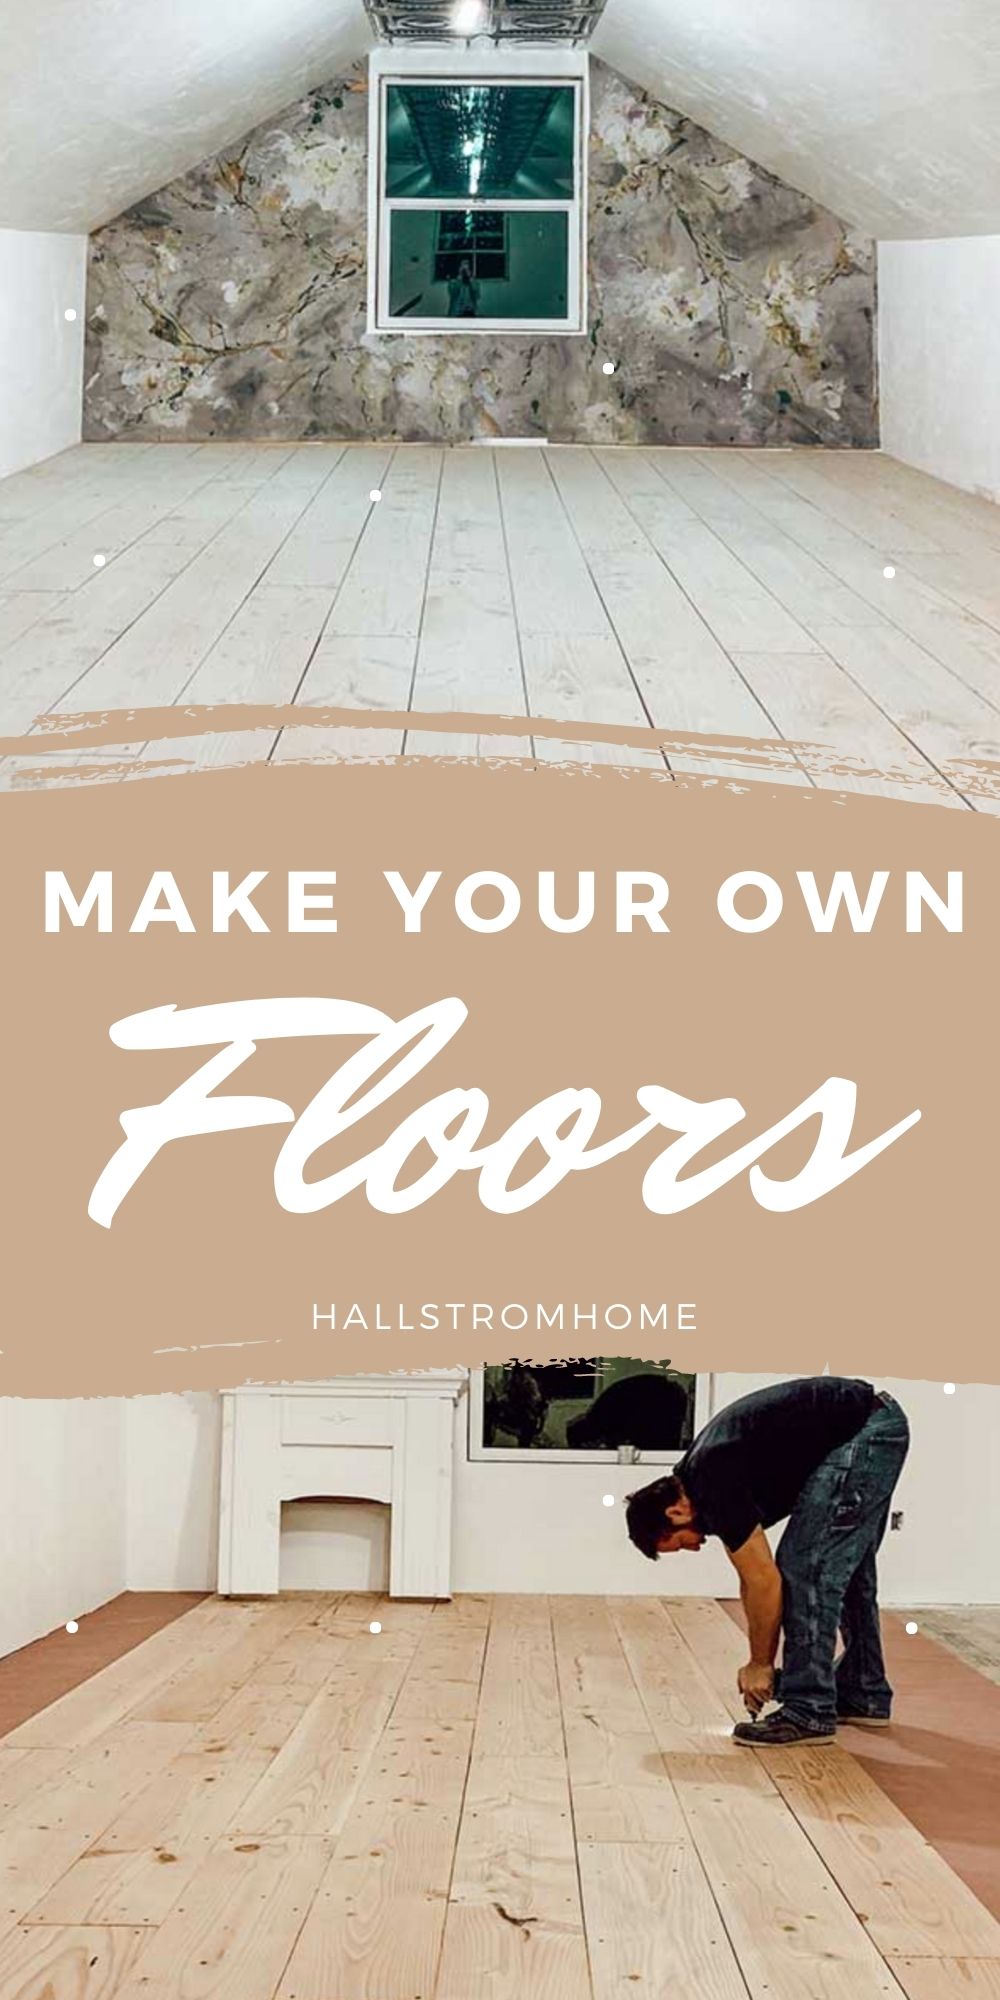
Ready to Make Your Own Plank Flooring-Using 1 x 12″ Lumber? We completed 860 square feet of fir flooring in our new office space. This is what we did. I hope it helps to simplify your space.
Be sure to sign up for my email to get new recipes, crafts and home ideas in your inbox, plus access to our free printable vault! *This post contains affiliate links*

Make Your Own Plank Flooring-Using 1 x 12″ Lumber
We started off by purchasing 1×12” fir from a local guy who has a small saw mill for his vast amount of timber. It’s always fun to dream of new creations when we go there. One thing when going through a small saw mill is the price of lumber is so much cheaper than the local hardware store. We bought kiln dried wood. But the boards all needed plained so we bought a plainer to get this job done. It took five times per board going through the plainer. It was a full days job. I’d recommend you buy your boards already done so you can save time.

Hard Wood Floors
We also ran each board down the table saw to square the boards up on each side. We then added a groove along the sides so the floors would look like real tung and groove planks. This helps cover up the unevenness of the boards plus we thought it gave the floor a bit more of a classier look than just farmhouse plank flooring.
Before the wood could get put down we added a roofing paper barrier down. This acts like an insulation and water barrier. Most people probably don’t add this but hubby likes to do things right. So once the paper was stapled down we could lay the boards. We didn’t want the seams to match so we staggered the boards and had to cut some smaller so the seams looked more random.

Wood Floor DIY
It didn’t take as long as I expected to lay the wood down. Hubby used long wood screws and sometimes it would split the wood so just be watchful of that. For me I didn’t care as we were going rustic with a grey wash over the boards. I knew I could work with any imperfections and there are a lot, but it looks great.

One thing I was hesitant on was adding the groves to the boards. I dreamed of sliding around in our office chairs from one corner to the next. After it was all done we found out that the chairs still roll quite nicely. Now that makes me happy.
We didn’t use any putty in the cracks. I just applied a watered down chalk paint to the floors and sealed with tung oil. I have chalk painted floors and years later they still look good. Make sure you read all the directions in that post, to get the full understanding. Check out our Large Wood Pizza Paddle diy, this is one of my hubby Vic’s projects I just shared.

Tips for making your own plank flooring
1. Buy your wood from a local lumber store
2. Any type of wood will work. Fir and pine are very soft wood so it’ll get marks and dings easier than a hardwood such as oak.
3. Apply a vapor barrier down before installing the wood planks.
4. Use wood screws. You can get decorative ones if you’d like. We used a star tip.
5. Stain, paint and seal the wood after installing.
6. We did not sand our boards so basically how you get the wood from the store is what we installed. I didn’t want the extra work when I was going for a bit more rustic look.

Questions you may have:
1. How long does this flooring last?
Years! Forever. It will be worn but it’ll look good.
2. How often do you reseal the floors?
I’m not a professional but the wood floors in the house get new tung oil every couple years. It’s super easy to apply and you can walk on it right away.
3. Would you paint or stain your floors?
I personally don’t like stain as it’s toxic but it depends on the look you want. I’m pretty good at using paint to get the look I want.
Bona has wood floor stain and finish is toxic free waterbased but it’s a 3 day process and spendier than the typical finish.
4. How to Install Wood Flooring over Concrete Floors?
I would glue the wood down, there are screws that are used for going into concrete so that might work. There’s glue in a caulk gun, I’d talk to someone at the hardware store and ask them for there strongest glue that holds wood to concrete. That should do the trick.
Let me know if you have any questions.


Hi Rhonda – I’m a little late to the party with my question, and forgive me if it’s already answered in the comment string. I’m curious about your transition from the room out to the hallway, or adjacent space? Did you have to make a custom transition piece, did it go wood plank height to carpet or whatever the flooring type? I read halfway through and in typical fashion, just rushed to the end. Again, apologies if this was already addressed; help a lazy Bespoke Warrior out? Thanks so much and I’m so in love with this project!
I dont care for transition pieces if I dont have to because of the vacuum. I would bump my carpet up to the edge and call it good.
I have planned on doing this for years and never got it done. There’s a number of local mills down by me here in Texas. Thank you so much for sharing this because I live in a tiny cabin and I want to do this. I really do. it’s been my dream forever except I was thinking about buying the squarehead nails. I want as rustic as I can go, I do better with the hammer than I do with the drill screw bit. Thank you so much for sharing and answering everything that I thought it was going to be!
I have planned on doing this for years and never got it done. There’s a number of local mills down by me here in Texas. Thank you so much for sharing this because I live in a tiny cabin and I want to do this. I really do. it’s been my dream forever except I was thinking about buying the squarehead nails. I want as rustic as I can go, I do better with the hammer than I do with the drill screw bit. Thank you so much for sharing and answering everything that I thought it was going to be and I love the floor color. It is absolutely gorgeous. I have pine walls, unfinished tongue and groove so I was thinking about going a little darker on the floor personally I just like dark wood and I want a little contrast. Again, I thank you. You guys did a beautiful, beautiful job.
I love this! I never would have thought of doing something like this in my home and I definitely didn’t know that you could use chalk paint on the floor. This gives me so many ideas that I want to try! Thank you for sharing!
My husband wants to know what size gaps your hubby left or did he just eyeball a small gap to allow for movement?
Thanks!
We did it about a 1/4″ apart
When you say you made grooves to the boards – what’s that mean? When you laid them down you didn’t put them exactly close together and Left a little gap? Just trying to figure out what grooves means?? Thanks
We made little grooves in the bottoms so they’re more secure to each other.
Pictures of the “grooves”? Do you mean a tongue on one side of the board and a groove on the other side??? T&G? Reference to a groove is very broad, just trying to understand. Thanks for sharing this great project!!!
I used plywood as wide plank pine flooring on a mobile home project.Turned out amazing. I want to use the fur next time.
what size did you use?? thickness and how wide did you go with it??
We used 1” thick by 12” wide
Since you bought the wood directly from a local mill, did you have them kiln-dried or did you store them for drying before use? We use our local mill as well for project wood, but the flooring has to be dried and there are no kilns nearby and I don’t have the patience to wait two years for the wood to be ready to lay.
To answer the question above about the grooves; your husband most likely used a router.
Oh no! Yes we bought already kiln dried wood for this!
What happens if you do not use dried wood for flooring?
It will warp and have wider grooves
Beautiful flooring. ❤ With the nails going in from the top, you won’t be able to refinish the floors, down the road a few years, because of the nail heads on top. Unless I am missing something. 💁♀️
My husband and I are building a new house after a fire that was a total loss and we just can’t seem to pick out the right flooring. But this is certainly a very good option.
Thank you for sharing.
Thank you Gretta! We just roll with whatever around here right now they have a grey wash over them and we love them
These look amazing. Excellent idea and incredible outcome. Quick question. When you said you made a grove on the side, did you offset the board with the inset?
I am not completely sure! Whoops hubby did most of the work. I would assume he did
Hi. Your looks great. I am thinking of doing the same.
What was the sq footage and what was the cost of the wood?
Chris
Im sorry I don’t actually don’t remember the square footage and the cost was from a private mill. So I am not remembering the price.
How would you install on concrete floors?
Glue maybe, there are screws that are used for going into concrete so that might work. Theres glue in a caulk gun, I’d talk to someone at the hardware store and ask them for there strongest glue that holds wood to concrete. That should do the trick.
Rhonda
strong as nails= best glue/ caulking
Lay a product called Platon wrap over the concrete. On top of that put a subfloor of OSB and then affix the wood flooring to that. This way you will get the barrier you want and some extra insulation. If you search YouTube for this technique you will find it is a common and cheaper way of doing a dry core subfloor over concrete.
Does that work in basements? I have done a wood floor similar to this with 1/4” maple cut into planks & laid with brad nails then varthayne the wood it seals the cracks. I put in my sunroom & looks beautiful I used the opposite side of maple for the veins. If it gets wet it’s cheap to replace 1 piece or all. You can also stain wood with vinegar & tea & steel Weil for gray & use coffee for browns
Sounds beautiful! Thanks for sharing your details and yes this would be great in the basement!
Hi! Are the planks pine? Gorgeous!
These are fir planks. Thank you!
What ratios of paint to water did you use?
It was about half and half. It was real watery so I could see the wood grain coming through.
Wow they look amazing!! I especially love love love the small cracks/seams between the planks! But can you see the roofing paper between the seams or is that what the applied groove is for?? I am having a hard time picturing this groove lol
Hello, We left a space between the planks for a shabby chic look. The paper is not noticeable with the color we chose. It really blends in and you can’t even tell. If we went with a black paper I think you would be able to see it.
Rhonda
I love these floors! Excellent look. How do you clean them?
Hello! Usually we just do a quick vacuum but to get a good cleaning we will just mop these as we normally would. With floor cleaner.
Wow! I’m in love with this Rhonda! I’d love to do this in my kitchen! Would I need to use some type of poly on it?
Always impressed with your ideas and talent!
Warmest regards
Amy Halberg
We are going to make a blog post this week on how to finish these floors. Myself I would use a tung oil!
Rhonda
Looks SOOOO good! I can’t wait to see it. Love the wallpaper, the floor color and the white!!!
FYI – my wood floor stain and finish is toxic free waterbased… bona has a product, but it’s a 3 day process and spendier than the typical finish.
Thanks Kim! the wallpaper is one of my favorite parts. That is so cool! I will have to look into it
I think they look amazing!!! 🙌. Really hoping we have the opportunity to try this in a house someday.
Thank you! Yes that would really be amazing